Internet Technologies
Tasks studies - laboratory
Project maintained by dawidolko Hosted on GitHub Pages — Theme by dawidolko
Basics of HTML5
Useful Resources:
link – the official specification of the HTML language; note that it is not versioned (unlike many programming languages). For example, there is no version 5.0.1 that might later be replaced by another version – only the date of the last change is recorded. This specification is the most important model for writing correct HTML documents. Historically, the W3C originally published versioned editions of HTML (the last marked as 5.3), which were all withdrawn on January 28, 2021 (all that ever existed).
link – the Mozilla Foundation website containing HTML documentation, interactive tutorials, and guides.
https://pl.wikipedia.org/wiki/HTML
https://pl.wikipedia.org/wiki/HTML5
HTML has been evolving for about 30 years. In the early period, practical implementations (i.e. browsers) often imposed certain solutions while official specifications were produced very slowly—and even when some results were achieved, they were sometimes rejected by the community. The first specification that achieved some stability was HTML4, released in 1997. HTML4 was formally a specific type of SGML (i.e. an application of SGML). Later, XHTML was developed—that is, figuratively speaking, HTML parsed as XML (also an XML application). HTML5 emerged as a result of dissatisfaction with both HTML4 and XHTML (especially regarding their complexity) and the need to unify the way web pages are created.
It is worth noting that in this guide the word “webpage” will be used interchangeably with the concept of an HTML document.
“HTML5 Document Skeleton”:
<!DOCTYPE html>
<html lang="en">
  <head>
    <meta charset="UTF-8" />
    <title>Title</title>
  </head>
  <body></body>
</html>
-
<!DOCTYPE html>– a declaration that the document is an HTML5 document; it is necessary due to some historical issues (i.e. this declaration was required by HTML4 and XHTML, and the obligation to include it was maintained so that outdated browsers and other clients could correctly recognize an HTML document). -
<html lang="en">– the root element of an HTML document with alangattribute whose value indicates that the document’s content is written in English; specifying the document language helps search engines and functions such as automatic translation. -
<head>– contains metadata about the page (the content of this tag is in principle not displayed). -
<title>– the title of the document displayed on the browser’s tab. -
<body>– contains all the visible content of the document.
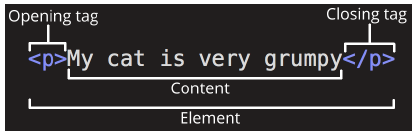
Tags (also known as elements):
• An opening tag, the content of the tag, and a closing tag:
<tag>content of the tag</tag>
• A tag without content (empty), which does not require a closing tag:
<tag></tag>
English naming conventions (useful when reading documentation):
<!-- This is a comment in HTML -->
Tag Attributes:
<tag attr1="value1" attr2="value2">content of the tag</tag>
<tag attr1="value1" attr2="value2" attr3="value3">
  <tag attr1="value1 value2 value3" attr2="value2">content of the tag</tag></tag
>
A tag can have multiple attribute values, which are separated by a space:
<tag attr1="value1 value2 value3" attr2="value2">content of the tag</tag>
There are also attributes that do not have any value:
<tag attr1>content of the tag</tag>
In practice, it is acceptable to “shorten” binary attributes in this way, following the convention that the presence of the attribute means its default value is true, and its absence sets the attribute to false. It is also possible to specify the attribute’s name or an empty value to indicate that it has a true value. However, explicitly assigning “true” or “false” is incorrect—that is, the official Living Standard forbids this (even though it is encountered in practice and supported by browsers).
<tag attr1="">content of the tag</tag>
<!-- correct -->
<tag attr1="attr1">content of the tag</tag>
<!-- correct -->

<tag attr1="false">content of the tag</tag>
<!-- incorrect -->
<tag attr1="true">content of the tag</tag>
<!-- incorrect -->
There are two groups of attributes: local and global.
- Global attributes are those that can be used with any tag, e.g.
class,id,style:
<tag id="introduction" class="">content of the tag</tag>
- Local attributes are those that can be used only with specific tags, e.g. the
<img>tag has the local attributealt:
<img src="/images/red_panda.jpg" alt="red panda" />
Attributes can be informally compared to the properties (fields) of an object.
Hints and Tips:
- HTML is not case-sensitive; however, it is recommended to write tag names in lowercase, which is widely practiced.
- Do not forget closing tags (except for those that do not require them, i.e. tag omission).
- When referencing resources located in the same domain, it is better to use relative paths; this avoids problems with moving them in the future (for example, to another server).
- Some tags have required attributes; for instance, the
<img>tag requires analtattribute that contains alternative text for the user in case the image cannot be displayed, or to assist with audio description for visually impaired users. - Attribute values must be enclosed in quotes when the value contains spaces or other characters (
" '= < >`), but it is recommended always to use quotes. - Using headings (HTML headers) is important not only for appearance but also for semantics.
- In paragraphs, additional spaces and newline characters are ignored when rendered.
- Inserting large images may slow down page loading.
- Currently, UTF-8 is the default character encoding (charset), which has replaced the once widely used ASCII; however, explicitly defining the character encoding may be helpful for outdated or non-spec-compliant clients (including browsers).
-
Some tags display content starting on a new line (block-level), while others do not (inline).
- For attributes such as
srcandhref, you should provide correctly defined URLs. These may be relative or absolute URLs. In a simplified view, one may assume that the folder containing the open HTML file is the current folder, and relative paths are defined with respect to it (this can be changed using the base element. More here: URL Writing, Miscellaneous).
The HTML Specification Distinguishes the Following Categories of Elements:

Task 1.
Create an index.html document (the common name for the main HTML document, automatically loaded by the HTTP server when a website URL is entered), and within it the document skeleton. The language of the document should be Polish, and the title should read:
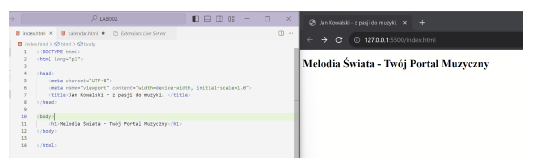
“Jan Kowalski – muzyka to moja pasja”
(which translates to “Jan Kowalski – music is my passion”).
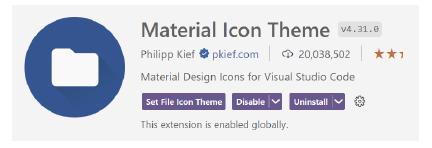
Open Visual Studio Code and open a project (folder) named LAB002. For clarity of the project tree, install the VSCode extension called Material Icon Theme, which provides icons for files and folders that suggest their content.
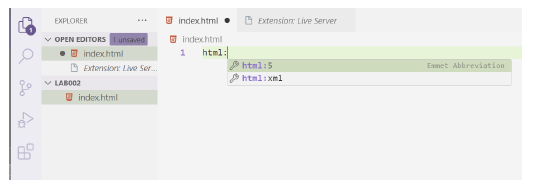
Type the string html: in the created index.html file and press Enter to insert the basic HTML5 document snippet.
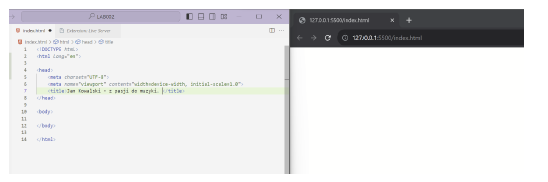
Set the page title in the <title> tag to “Jan Kowalski - z pasją do muzyki” (“Jan Kowalski - with a passion for music”).
Install the extension “Live Server”. This is a development server (used for creating pages, not hosting them in production). The word “Live” means that after any change the server reloads the page and renders it immediately.
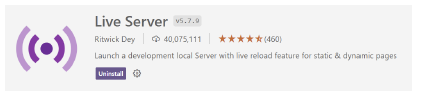
Run the page in the browser by right-clicking in the editor and selecting Open with Live Server.
The extension will automatically refresh the page after saving the file in VSCode.
An unsaved file is indicated by a dot on the file’s tab. Save the file and remember the shortcut (Ctrl+S) for saving (the dot should disappear and the page in the browser should refresh).
There is also an option to install an extension that renders HTML inside VSCode for a quick preview.
To enable the preview, first press Ctrl+Q and then, after releasing these keys, press S.
Task 2.
The tags <h1> to <h6> are used to create headings for sections of a document.
The first-level heading <h1> is the most important. In the past it was recommended to use it only once per document; however, HTML5 has removed this restriction. Headings may appear multiple times in a document.
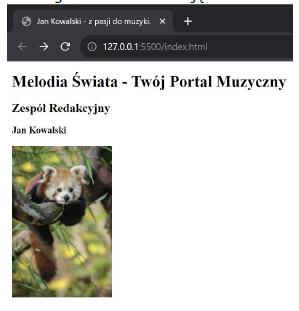
- Create a first-level heading containing a page title related to your interests, for example: “Topo Wspinaczkowe – przewodnik dla nowicjuszy” (“Climbing Routes – A Guide for Beginners”).
- Create a second-level heading with the title “Zespół Redakcyjny” (“Editorial Team”) and a third-level heading with a full name.
The tag <img src="" alt=""> is used to embed images in a document. The attributes src and alt are required!
- src= defines the path to the image (a relative path is preferred).
- alt= is the text displayed if the image cannot be loaded.
<img src="images/red_panda.jpg" alt="Panda czerwona" />
More about the <img> tag:
link
link
Note: It is assumed that in the current folder (i.e. the folder where this HTML document is located) there is a subfolder named “images” that contains the JPEG image.
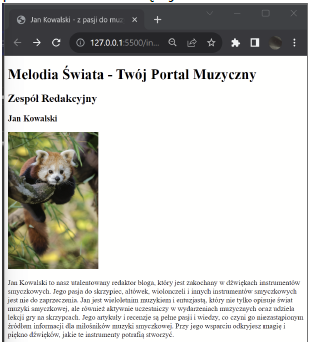
Place the editor’s photo (in JPG format) below the heading.
Including very high-quality images will significantly reduce the performance of processing an HTML document by the browser.
The <p> tag indicates that a section of the document is a paragraph. This means its content is thematically connected and a space will appear between it and other elements when rendered.
<p>Content of the paragraph.</p>
Use this tag to create a description of the editor below the photo. The description should contain more than 600 characters.
The <hr> tag (horizontal rule) indicates that a topic change occurs in the further part of the document.
Add a new editor and then separate the content concerning individual editors with the <hr> tag.

Task 3.
-
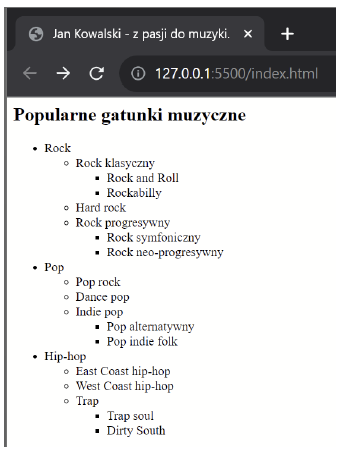
Create a second-level heading “Najpopularniejsze artykuły” (“Most Popular Articles”).
-
Create a three-level unordered list related to the website’s theme.
Example list:
Lists are created by defining a root element using <ol> (ordered list) or <ul> (unordered list). Then, within the element, define list items using <li> tags.
<ol>
  <li>element 1</li>
  <li>element 2</li>
  <li>element 3</li>
  <li>element 4</li>
  <li>element 5</li>
</ol>
<ul>
  <li>element 1</li>
  <li>element 2</li>
  <li>element 3</li>
  <li>element 4</li>
  <li>element 5</li>
</ul>
To create a nested list, define a new list within a list item:
<ol>
  <li>element 1</li>
  <li>element 2</li>
  <li>
    element 3
    <ul>
      <li>element 1</li>
      <li>element 2</li>
      <li>element 3</li>
      <li>element 4</li>
      <li>element 5</li>
    </ul>
  </li>
  <li>element 4</li>
  <li>element 5</li>
</ol>
Task 4.
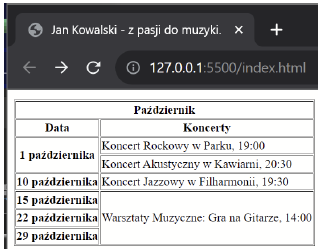
Create a heading “Terminarz Wydarzeń” (“Event Schedule”) and then create a table related to events that are thematically linked to the website’s title. When creating the table, use the attributes colspan (to merge columns) and rowspan (to merge rows) to combine cells appropriately.
Example table:
Example table code:
<table border="1">
  <thead>
    <tr>
      <th>Column 1 Header</th>
      <th>Column 2 Header</th>
      <th>Column 3 Header</th>
    </tr>
  </thead>
  <tbody>
    <tr>
      <th>Row 1 Header</th>
      <td>cell 1</td>
      <td>cell 2</td>
    </tr>
    <tr>
      <th>Row 2 Header</th>
      <td>cell 3</td>
      <td>cell 4</td>
    </tr>
  </tbody>
</table>
• <table border="1"> – the main tag within which the table structure is defined.
The border attribute is added solely for demonstration/testing purposes to show the table’s appearance. THE BORDER ATTRIBUTE SHOULD NOT BE USED ACCORDING TO THE CURRENT HTML SPECIFICATION!
• <thead> – groups the table header.
• <tbody> – groups the table body elements.
• <tr> – defines a table row, within which cells are defined.
• <th> – defines a header cell.
• <td> – defines a data cell.
Rows and columns are merged using the attributes rowspan and colspan added to the cell tags. When merging cells, specify the appropriate number in that dimension.
<table border="1">
  <thead>
    <tr>
      <th>Column 1 Header</th>
      <th colspan="2">merging two headers</th>
      <th>Column 4 Header</th>
    </tr>
  </thead>
  <tbody>
    <tr>
      <th>Row 1 Header</th>
      <td>cell 1</td>
      <td>cell 2</td>
      <td>cell 3</td>
    </tr>
    <tr>
      <th>Row 2 Header</th>
      <td>cell 4</td>
      <td>cell 5</td>
      <td rowspan="2">merging two cells in a column</td>
    </tr>
    <tr>
      <th>Row 3 Header</th>
      <td>cell 7</td>
      <td>cell 8</td>
    </tr>
  </tbody>
</table>
Task 5.
The <footer> tag designates a section of the document where additional information is provided, such as contact details, copyright information, links to other sites, and other details.
Using the knowledge you have acquired about HTML, create a document footer that correctly uses the following tags:
<address>– within this tag, the contact information should be defined.<a href="">– used to create hyperlinks (links) in documents. Thehrefattribute defines the destination URL.<img width="", height="">– embedded within an<a>tag and serving as links to social media (i.e. the image is simultaneously a link). Thewidthandheightattributes define the size of the image in pixels.
Use character entities to represent copyright:
Before UTF-8 became widespread, entities were necessary to represent special characters. Nowadays, they are more often used to correctly display the characters < and >, which can easily be confused syntactically with the beginning/end of tags.
Task 6.
Familiarize yourself with the documentation of the following tags:
Then write a paragraph that correctly utilizes the following tags:
<b>– represents a portion of text that is meant to bring attention to it for practical reasons, without conveying additional meaning or suggesting a different narrative or mood (as keywords might in a document summary). Historically, this was the “bold font” presentation tag; many browsers still render its content as bold, but you should no longer rely on that behavior. For example, a search engine will treat the content of this tag as crucial for the page (affecting its ranking for a given phrase), so it should not be used to mark arbitrary text.<i>– represents text in an alternative narrative or mood, or in a way that deviates from normal text (e.g., a technical term). Historically, this was the “italic” presentation tag; many browsers still render its content in italics, but that behavior should not be relied upon.<q>– represents a quotation.
Compare the rendering results of the following tags:
<cite><em><var>
What can you say about them?
Task 7.
Organize the page content using the following tags:
<hgroup>– used for grouping headings<h1>–<h6>that form a section’s hierarchy.<header>– used to contain information or elements typically placed at the top of a page that provide general information about the page’s content or a section.<article>– semantically represents a section or content that forms an independent, self-contained part of a webpage or document.<section>– for content that is thematically or conceptually related.<aside>– for supplementary information that might be interesting but is not essential to understand the main content.<nav>– designates a navigation section of a webpage.<menu>– creates a menu; it is used instead of the<ul>tag to semantically indicate that the options defined within it (using<li>) form a menu.
For each second-level heading, add a unique id attribute. Then create a menu consisting of hyperlinks to the respective headings.
Hyperlinks can refer to headings by defining the href value as #[id of the tag]:
<a href="#heading">Go to the heading with id "heading".</a>
<div style="display: block; height: 5000px;"></div>
<h2 id="heading">Heading with id "heading"</h2>
Below is the complete translation for Task 8 and the remaining content:
Task 8.[*]
Create a document that serves as your first blog post. Use the knowledge you have acquired to generate the blog entry content, include images, and add an interesting fact. The interesting fact should be defined using the <details> and <summary> tags.
Also consider using the following tags:
<mark><cite><ruby>