Internet Technologies
Tasks studies - laboratory
Project maintained by dawidolko Hosted on GitHub Pages — Theme by dawidolko
Basics of CSS3
The idea of separating the presentation layer (i.e. the visual appearance on the end device) of a document from its structure was first utilized in a markup language.
Scribe: link.
When HTML was first created, style sheet languages were already used to style SGML (namely DSSSL and FOSI), but for various reasons (mainly their complexity) they were considered inadequate for styling HTML documents.
Initially, several competing style languages were proposed, and gradually CSS prevailed, although an issue was incomplete browser support.
There were also cases when browser developers added their own ideas and implementation choices that were not present in the standards at all—this only deepened the chaos and delayed the standard’s widespread adoption.
In parallel, presentational tags were also used, which further hindered the adoption of CSS.
CSS was a uniform specification up to version 2.0. With the introduction of CSS3, the standard was modularized (i.e. individual modules develop independently and have their own versions).
Currently, there are no plans to release CSS4 as a unified version; rather, new module versions will be released.
More on this topic can be read here:
link
CSS is a formal language (i.e. it has a strictly defined grammar), but it is not a programming language (it cannot execute arbitrary algorithms).
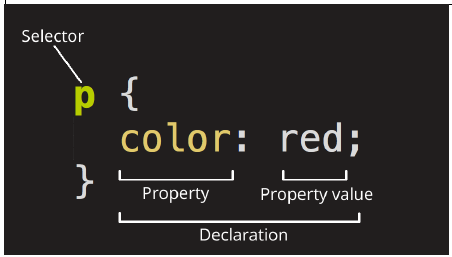
Essentially, CSS consists of style rules. Most style rules consist of a selector, followed by a declaration block (enclosed in curly braces) containing one or more declarations separated by semicolons. A declaration is a property–value pair. In principle, the CSS standard defines a closed set of properties and available values for them, although there are now solutions that allow you to extend CSS with your own properties.
A complete list of available properties can be found here:
link
A file with the *.css extension containing CSS code is called a stylesheet.
selector {
  property: value; /* declaration */
}
selector {
  property1: value1; /* declaration 1 */
  property2: value2; /* declaration 2 */
}
selector1,
selector2 {
  property1: value1;
  property2: value2;
}
A CSS selector can take various forms. It may be an element name (an HTML tag), which means that all occurrences of that HTML element will be styled according to the specified rules. Another form is an arbitrary name preceded by a dot (a CSS class selector). An identifier (id) can also serve as a CSS selector. There is also a special selector ‘*’, which applies to all HTML elements on the page. Additionally, a selector may contain an attribute condition, which allows selecting elements with a specified attribute value. In this way, using various selectors makes it possible to precisely specify which elements on a webpage will be styled using CSS rules.
You can clearly tell whether a given selector is an element selector, a class selector, etc. by referring to the CSS grammar (i.e. each type of selector forms a different expression in CSS). We distinguish the following selectors:
Element Selector (highlighted in yellow) is simply the name of the tag, e.g.:
<!DOCTYPE html>
<html lang="pl">
  <head>
    <meta charset="UTF-8" />
    <meta name="viewport" content="width=device-width, initial-scale=1.0" />
    <title>Element Selectors</title>
    <style>
      /* The text color of paragraph elements will be crimson */
      p {
        color: crimson;
      }
      /* The text color of h1 elements will be black */
      h1 {
        color: black;
      }
      /* In the preformatted section, text will be orange */
      pre {
        color: #ffaa00;
      }
    </style>
  </head>
  <body>
    <h1>Heading</h1>
    <p>Paragraph</p>
    <pre>Preformatted section</pre>
  </body>
</html>
Class Selector – a class selector is denoted by a period (.) before the class name to which it applies. When defining class names, you should:
- Avoid using keywords and HTML tag names (e.g.,
.divor.spanare not recommended). - Use a short and descriptive name (e.g.,
.header,.btn-light). - Not include Polish characters.
- For multi-word names, use camelCase or separate the words with a dash (e.g.,
.btn-pressedor.btnPressed). - Follow the chosen convention consistently throughout the document(s).
- The same class can be applied to any HTML element.
<!DOCTYPE html>
<html lang="pl">
  <head>
    <meta charset="UTF-8" />
    <meta name="viewport" content="width=device-width, initial-scale=1.0" />
    <title>Class Selectors</title>
    <style>
      /* Text color will be crimson */
      .class1 {
        color: crimson;
      }
      /* The displayed text will be very small */
      .class2 {
        font-size: xx-small;
      }
    </style>
  </head>
  <body>
    <p class="class1">Paragraph 1</p>
    <p class="class2">Paragraph 2</p>
    <!-- Paragraph 3 uses both classes. The text will be crimson and small. -->
    <p class="class1 class2">Paragraph 3</p>
  </body>
</html>
ID Selector – an ID selector is denoted by a hash (#) before the identifier name.
<!DOCTYPE html>
<html lang="pl">
  <head>
    <meta charset="UTF-8" />
    <meta name="viewport" content="width=device-width, initial-scale=1.0" />
    <title>ID Selectors</title>
    <style>
      /* Text color will be crimson */
      #paragraph1 {
        color: crimson;
      }
      /* Displayed text will be very small */
      #paragraph2 {
        font-size: xx-small;
      }
    </style>
  </head>
  <body>
    <p id="paragraph1">Paragraph 1</p>
    <p id="paragraph2">Paragraph 2</p>
  </body>
</html>
Attribute Selector – to the element name, you add an expression enclosed in square brackets “[]” in which you define the attribute or attribute–value pair that the element must have.
<!DOCTYPE html>
<html lang="pl">
  <head>
    <meta charset="UTF-8" />
    <meta name="viewport" content="width=device-width, initial-scale=1.0" />
    <title>Attribute Selectors</title>
    <style>
      input[type="text"] {
        border: 1px solid #ccc;
        padding: 5px;
      }
    </style>
  </head>
  <body>
    <input type="text" placeholder="Enter something" />
    <!-- This input will be styled due to type "text" -->
    <input type="password" placeholder="Password" />
    <!-- This input will not be styled, as it is not type "text" -->
  </body>
</html>
Pseudo-class Selector – denoted by a colon (:) preceding the pseudo-class name. Pseudo-classes allow you to create dynamic and interactive effects on a webpage. They define the element’s behavior in a certain state (e.g. when hovered over or clicked) rather than relating to its position in the document.
<!DOCTYPE html>
<html lang="pl">
  <head>
    <meta charset="UTF-8" />
    <meta name="viewport" content="width=device-width, initial-scale=1.0" />
    <title>Pseudo-class Selectors</title>
    <style>
      a:hover {
        color: red;
      }
    </style>
  </head>
  <body>
    <a href="https://www.example.com"
      >Hover over this link to change its color</a
    >
  </body>
</html>
Pseudo-element Selector – pseudo-elements allow you to add content or style specific parts of an element, such as the first letter of text, the first line of text, or content before or after an element. Typically, these elements do not physically exist in the document (i.e. they are part of another element and are not isolated as separate HTML tags) so that styles can be applied in a different manner. The selector is created by appending :: followed by the pseudo-element name to the element name.
<!DOCTYPE html>
<html lang="pl">
  <head>
    <meta charset="UTF-8" />
    <meta name="viewport" content="width=device-width, initial-scale=1.0" />
    <title>Pseudo-element Selectors</title>
    <style>
      p::before {
        content: "Before the paragraph: ";
        font-weight: bold;
        color: blue;
      }
    </style>
  </head>
  <body>
    <p>This is a regular paragraph.</p>
  </body>
</html>
For more information, see: link
Applying CSS Styles:
• Inline styles – declared using the style attribute directly on an element. Using this method as the only styling technique is bad practice! It is generally recommended to use CSS stylesheets; inline styles should be used only for styling individual elements in an unusual way when an appropriate selector in a stylesheet would be too complex. Inline styles do not have selectors. Their obvious drawback is that they are “one-time use” – you would have to define them for each element individually, which is wasteful and complicates the management of larger HTML documents:
<tag style="color: lightblue;">content of the tag</tag>
<tag>this content will not be styled</tag>
• Internal styles – should be declared within the <head> section inside a <style> tag. In earlier days of the web, when pages were relatively simple (for example, personal websites), it was often sufficient to define concise rules within the HTML document. Nowadays, this technique is less common as the complexity of webpages and web applications is generally too high for this solution to remain useful:
<head>
  <meta charset="UTF-8" />
  <title>Title</title>
  <style>
    selector {
      property: value;
    }
  </style>
</head>
• External styles – this means linking to an external stylesheet defined in a separate file with a *.css extension. This file may reside locally on the server (using a relative path) or on an external server (using an absolute URL). This is the primary way to use CSS nowadays. External stylesheets are included in the <head> using the <link> element:
<head>
  <meta charset="UTF-8" />
  <title>Title</title>
  <link rel="stylesheet" href="styles.css" />
  <link rel="stylesheet" href="https://www.example.com/styles.css" />
</head>
Selectors can be combined. There are several combinators in CSS that define which elements the styles should apply to.
| Combinator | Syntax | Description |
|---|---|---|
| Descendant Combinator | A B |
Element B is a descendant of element A (at any level). B must appear inside A. |
| Child Combinator | A > B |
Element B is a direct child of A (B is immediately inside A). |
| Adjacent Sibling Combinator | A + B |
Element B immediately follows A on the same level (they share the same parent). |
| General Sibling Combinator | A ~ B |
For example, h2 ~ p selects all p elements that come after an h2, regardless of how many. |
| Group Combinator | A, B |
For example, h1, h2, h3 allows you to select multiple different elements; in this case, all h1, h2, and h3 tags. |
As a rule, in stylesheets, inheritance means that an HTML element that is a child of another element will by default have the same property values as its parent. However, the CSS standard is not entirely consistent here because not all properties are inherited. In general, it is possible to use multiple stylesheets in one document; however, this may generally cause conflicts between different stylesheets regarding how a given element is finally rendered. In addition, there are stylesheets of different levels (browser, author, and user) that have a certain evaluation order. In practice, there is a specific algorithm that determines a deterministic hierarchy of which style will ultimately be used. Also, remember that some properties have default values even if they are not explicitly defined. In practice, to work efficiently with CSS you must learn the interdependencies between cascading, specificity, and inheritance. More can be read here:
What happens when multiple selectors target the same part of an HTML document and define the same property? For example:
<!DOCTYPE html>
<html lang="pl">
  <head>
    <meta charset="UTF-8" />
    <meta name="viewport" content="width=device-width, initial-scale=1.0" />
    <title>Selectors</title>
    <style>
      p {
        color: red;
      }
      .class1 {
        color: green;
      }
      #akapit {
        color: blue;
      }
    </style>
  </head>
  <body>
    <p class="class1" id="akapit1">Paragraph</p>
  </body>
</html>
In such cases, the algorithm for calculating specificity will determine which style is applied.
- ID count (most important): Each ID selector (e.g.
#myId) in the selector increases specificity by 100. The more IDs in a selector, the higher its specificity. - Class and attribute count: Each class selector (e.g.
.myClass) or attribute selector (e.g.[type="text"]) in the selector increases specificity by 10. - Element and pseudo-element count: Each element selector (e.g.
div) or pseudo-element (e.g.::before) in the selector increases specificity by 1.
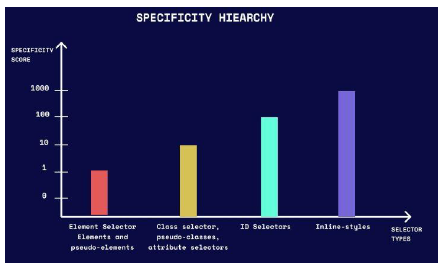
If two rules have the same specificity, the last defined in the stylesheet will be applied.
For example:
#myIdhas a specificity of 100.p.myClasshas a specificity of 11 (1 for element p and 10 for the class).ul li ahas a specificity of 3 (3 for elements).ul ol+lihas a specificity of 22 (2 for classes and 1 for an element).
Also note how styles are defined. The most important styles are always inline. The only way to override an inline style is to use !important on that property (in general, !important changes the default evaluation of CSS rules).
Another important concept is the box model. Each element is represented as a rectangle composed of the following areas:
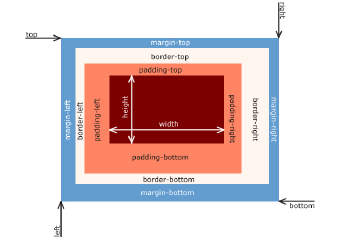
More information can be found here: link. In practice, an additional complication is that there are essentially two independent box models, which differ in whether the element’s set size includes padding and border. This distinction arose because one once-dominant browser ignored the CSS standard and introduced its own box model. The standard was later forced to accommodate this de facto innovation. More here: link.
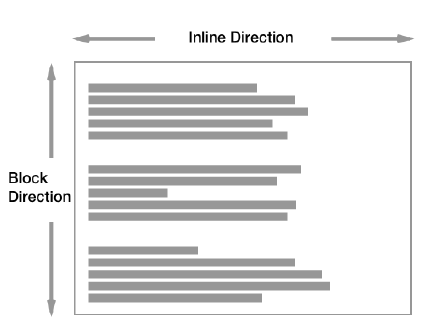
Another important issue is the default layout behavior of elements on a page (the normal flow layout). Elements are by default rendered as either “block” or “inline”, but never both simultaneously. More can be read here: link. It is possible to change an element’s layout using the display property (later on, entirely new options were also added).
Task 1.
Copy the following example:
<!DOCTYPE html>
<html>
  <head>
    <title>CSS Basics</title>
    <style>
      p {
        color: red; /* CSS comment */
      }
    </style>
  </head>
  <body>
    <p>This paragraph will be red.</p>
    <p>This one as well.</p>
    <p>And so will every other paragraph.</p>
  </body>
</html>
- Add a style attribute to the second paragraph and change its text color to green.
- Add an
<h1>element with the text “Akapity w CSS” (“Paragraphs in CSS”) and then write an appropriate selector that sets its text color to orange and adds an underline. - Add a
<p>element to the HTML document, give it anid="special", and then write an appropriate selector that changes only this element’s background color to light yellow and its text color to black. - Add a class called
examplein your styles that defines an italic font, padding of 10px, and margin of 50px. Then add another<p>element and apply this class to it. Next, add a<span>element and also apply this class.
Remember to ensure that the elements have non-empty content so that you can visually see the styling effects.
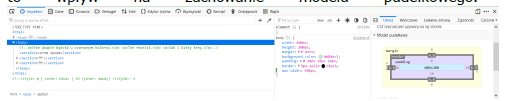
Task 2.
Create a valid HTML document, then place the following rules in the head section:
body {
  width: 400px;
  height: 200px;
  margin: 0 auto;
  background-color: #b8ebc3;
  padding: 0 20px 20px 20px;
  border: 5px solid black;
}
img {
  max-width: 20px;
  max-height: 20px;
}
section {
  border: 1px solid red;
}
span {
  background-color: aqua;
}
The body tag should contain:
<body>
  <section>Lorem ipsum</section>
  <section>Lorem ipsum <span>abc</span></section>
  <section>Lorem ipsum <img src="obraz.png" alt="obraz" /></section>
</body>
The image should be at least 200x200px.
- Open developer tools (F12 or Fn + F12) and then disable properties in the body selector one by one. Observe the effect on the box model.
- Then modify the img selector so that the maximum image size is doubled (i.e. 40x40px). What effect does this change have on the parent element’s box model?
- Next, set the exact size of the image to 200x200px. What happens? Then remove the width and height properties from the body selector; what is the effect?
- Modify the padding and margin properties for the span selector. Can you explain the resulting rendering?
- In the same section, add a div element and also set its padding and margin using a selector. What is the effect this time?
- Add the property
box-sizing: border-box;to the body tag. What change does this cause? - In the span selector, successively set the following display values:
display: inline; /* default value for span */
display: block;
display: inline-block;
What impact do these values have on the box model of the span element and its parent?
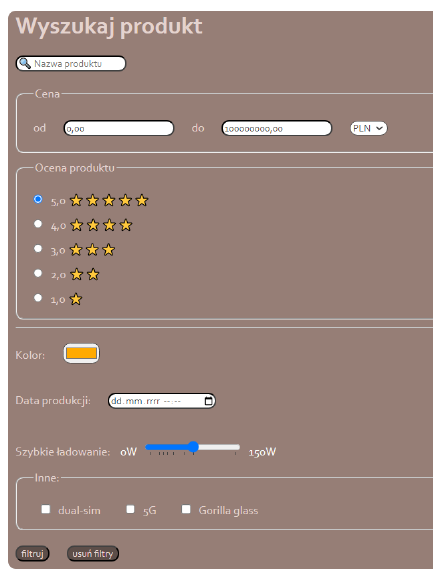
Task 3.
Replicate the form from the previous lab sessions, but this time make it look as shown below. Use an external stylesheet.
The following properties were used:
Colors:
#414141
#fbfbfb
#5d4e49
#e4d3ce
Font:
Corbel
Then create another stylesheet so that the same form looks as shown below:
Colors:
#fefefe
#0033A0
Font:
Open Sans

Task 4.
Copy the following example. Read the article about inheritance in CSS: link. Then modify the example so that:
- The
<p>element inherits the value of the border property. - The
<p>element has the default values for all properties. Use the special propertyall. - The
<p>element has all the same properties as its parent. Again, useall.
<!DOCTYPE html>
<html lang="en">
  <head>
    <meta charset="UTF-8" />
    <meta name="viewport" content="width=device-width, initial-scale=1.0" />
    <title>CSS Inheritance</title>
    <style>
      section {
        border: 1px dashed red;
        color: red;
      }
    </style>
  </head>
  <body>
    <section>
      This element will be bordered and have red text.
      <p>This element will not be bordered, but it will have red text.</p>
    </section>
  </body>
</html>
Task 5.
Next, create a stylesheet named cascade_example.css:
section {
  border: 5px solid orange;
  color: white;
}
- Include this stylesheet in the head using a
<link>element placed before the<style>element. What is the effect on the document’s rendering? In developer tools, inspect the styling rules for thesectionelement—what do you observe? - Then move the
<link>element below the<style>element. What do you observe now? - Add the declaration:
background-color: black;
What is the effect of inserting the stylesheet both before and after the<style>element? - Modify the stylesheet as follows:
border: 5px solid orange !important;
What is the effect when the stylesheet is placed both before and after the<style>element? - Add an inline style attribute to the section element:
style="color: #000;"
What is the effect when the stylesheet is placed both before and after the<style>element? - Using this tutorial: link, add a user stylesheet to your browser and change the value of the color property to something different from the one specified; also set the padding value to 100px. Chrome is preferred, which uses an extension to ensure these changes are not permanent! What effect did these changes have? It may help to use developer tools and compare the effect with and without inline styles.
Task 6.
Define CSS styles that will cause the following:
-
Adding the class
"row-stripes"to a table will make even-numbered rows in the table have the color#73BBE6. If the table has headers, they should have a background color of#666652. -
Adding the class
"col-stripes"to a table will make even-numbered columns in the table have the color#73BBE6. If the table has headers, they should have a background color of#666652.
Adding the class should work on a table of any size.
Test the style on the following table:
| Header 1 | Header 2 | Header 3 |
|---|---|---|
| 1 | value 1 | technology |
| 2 | value 2 | internet |