Internet Technologies
Tasks studies - laboratory
Project maintained by dawidolko Hosted on GitHub Pages — Theme by dawidolko
JavaScript 1
JavaScript is primarily an interpreted, dynamically typed, object‑oriented programming language whose syntax is derived from C, C++, and Java (generally, C‑like languages). However, it is important to note that sometimes it is unwise to carry programming habits over from other languages into JavaScript, even if the syntax seems very similar or identical. Formally, standardization of this language is handled by the ECMA organization, which issues the ECMAScript standard. JavaScript is understood as a concrete implementation of that standard. This language was introduced mainly to enable dynamic content generation on the client side (in the browser) and to introduce greater interactivity on webpages. Importantly, during its evolution the language’s syntax was significantly updated at one point (this version is marked as ES6). In the early days of JavaScript, it was believed that apart from professional programmers, it would be used by amateurs, hobbyists, and others not professionally involved in programming. This led to a considerable flexibility in the language and “forgiveness” for errors (including syntax errors) made by programmers. It is also worth noting that today JavaScript is a general-purpose language that has moved beyond merely writing interactive webpages. Separate functionalities (which are not necessarily available from within the browser) are provided by node.js (writing backend code in JavaScript), Electron (creating web‑based desktop applications), and solutions for building hybrid mobile applications (e.g. Ionic, React Native).
It is common to use the colloquial abbreviation “JS” instead of the full name JavaScript, and this abbreviation may be used throughout this guide.
1. Running Scripts
The simplest way to write JavaScript programs is by using the browser’s console (which opens in a mode where code is interpreted line by line):
An alternative is to include a script inside a <script> tag:
<!DOCTYPE html>
<html lang="en">
  <head>
    <meta charset="UTF-8" />
    <meta name="viewport" content="width=device-width, initial-scale=1.0" />
    <title>Document</title>
  </head>
  <body>
    <script>
      var a = 1; // declaration and initialization of variable a
      console.log(a); // output variable a to the browser console
    </script>
  </body>
</html>
Such a script will automatically be executed by the browser.
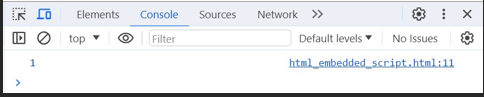
For longer scripts, however, this approach is rather inefficient, and you can include an external script instead:
<!DOCTYPE html>
<html lang="en">
  <head>
    <meta charset="UTF-8" />
    <meta name="viewport" content="width=device-width, initial-scale=1.0" />
    <title>Document</title>
  </head>
  <body>
    <script src="sample.js"></script>
  </body>
</html>
2. Declaring Variables
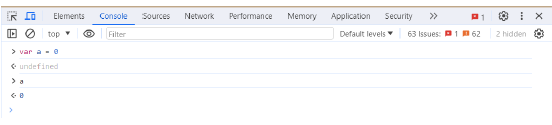
In the early days of the language, the keyword var was used to declare variables. Today, it is not recommended to use this construction in new code, especially when writing modern classes. However, because a great deal of legacy code uses var, understanding this syntax remains necessary. Note that var creates a variable of any type.
var a = 1;
console.log(a); // prints the variable to the browser console
Fundamentally, the language allows you to omit the declaration:
a = 1;
console.log(a); // prints the variable to the browser console
In such a case, JavaScript automatically uses a construct roughly equivalent to:
var a; // declaration of variable a
a = 1; // initialization of variable a
console.log(a); // prints the variable to the browser console
It is not recommended, however, to omit variable declarations; this is considered a bad practice.
In ES6, a new way to declare variables was introduced using let and const.
let a = 1; // a mutable variable whose value can change
const b = 0; // a constant that is immutable; its value cannot be changed
a += 1; // the variable a can be modified
console.log(a);
b += 2; // this will throw an error because b is a constant
Unlike with var, omitting the declaration when using let or const is problematic since the JavaScript interpreter cannot infer whether you intend to use a mutable variable or a constant. In general, such constructs are not used.
It is also important to familiarize yourself with the phenomenon known as hoisting.
link
Not knowing this concept (or failing to account for its occurrence) can lead to unexpected errors.
3. Objects in JavaScript
JavaScript has a rather unique object system. Most object-oriented languages are based on classes (the class‑based object model), from which objects are created. JavaScript, however, is based on prototypes (the prototype‑based object model). In short, in JS you create objects, which can then be used to create additional objects (even ones that extend the original) without the need to write classes. Every object in JS has a prototype (which might be null, but usually the language sets one internally; manually created objects generally should not have a null prototype).
The simplest way to create an object in JS is using an object literal:
const obj = {};
Despite the brevity of this syntax, the object created (as seen below) has methods:
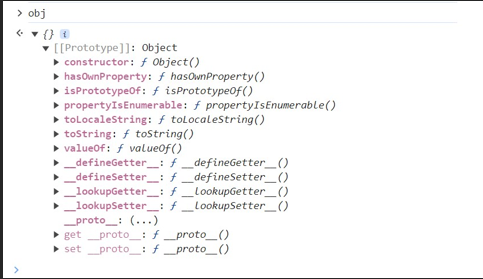
You might ask: where did these methods come from? Although not written explicitly, the object obj has its prototype set to Object. Essentially, Object is a complex data type (more here: link). The Object itself has a prototype set to null:

Now let’s declare a more “useful” object (again using an object literal):
const person = {
  name: null,
  printIntroduction: function () {
    return `I am ${this.name}`;
  },
};

This object now has, besides its prototype of Object, a property name and a method printIntroduction.
It is now possible to define a new object whose prototype is person (note that in the example below, we simply override the parent’s property value, while the parent’s value remains unchanged):
const mark = Object.create(person);
mark.name = "Mark";
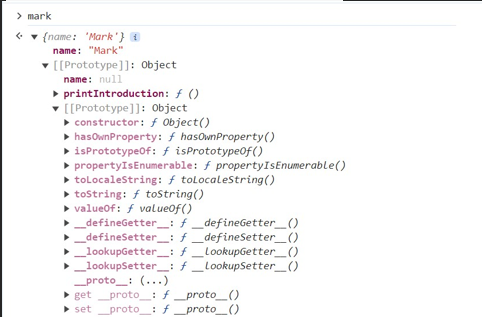
Thus, the object mark has as its prototype the object person, which in turn has Object as its prototype (and Object itself has a prototype of null). In JS, this chain of prototypes can become very complex and is called the prototype chain.
More information: link and link.
Another common construct is the following (a constructor function):
function Person(name) {
  this.name = name;
  this.printIntroduction = function () {
    return `I am ${this.name}`;
  };
}
susan = new Person("Susan");
JavaScript also allows you to “compose” an object from other objects.
const HoursEmployee = {
  computeHourlyPayment(hours) {
    return hours * this.hourlyRate;
  },
};
const FullTimeEmployee = {
  computeMonthlySalary() {
    return this.salary;
  },
};
function FullTimeEmployeeWithAdditionalHourlyPayment(salary, hourlyRate) {
  return {
    salary,
    hourlyRate,
    ...FullTimeEmployee,
    ...HoursEmployee,
    computeOverallPayment(additionalHours) {
      return (
        this.computeHourlyPayment(additionalHours) + this.computeMonthlySalary()
      );
    },
  };
}
const f = new FullTimeEmployeeWithAdditionalHourlyPayment(5000, 40);
console.log(f.computeOverallPayment(10));
The object FullTimeEmployeeWithAdditionalHourlyPayment represents an employee who works full-time and also receives additional hourly pay (e.g. for overtime or for temporarily substituting another employee). This object is created by composing the HoursEmployee and FullTimeEmployee objects along with the properties salary and hourlyRate.
Alternatively, the following construction is also possible:
const hourlyPaymenter = (state) => ({
  computeHourlyPayment(hours) {
    return hours * state.hourlyRate;
  },
});

const fullTimePaymenter = (state) => ({
  computeMonthlySalary() {
    return state.salary;
  },
});

function HourlyEmployee2(hourlyRate) {
  let x = { hourlyRate: hourlyRate };
  return Object.assign(x, hourlyPaymenter(x));
}

function FullTimeEmployee2(salary) {
  let x = { salary: salary };
  return Object.assign(x, fullTimePaymenter(x));
}

function FullTimeEmployeeWithAdditionalHourlyPayment2(salary, hourlyRate) {
  let x = { salary, hourlyRate };
  let o = Object.assign(x, hourlyPaymenter(x), fullTimePaymenter(x));
  o.computeOverallPayment = (additionalHours) => {
    return o.computeMonthlySalary() + o.computeHourlyPayment(additionalHours);
  };
  return o;
}
const he = new HourlyEmployee2(20);
console.log(he.computeHourlyPayment(5));

const fte = new FullTimeEmployee2(5000);
console.log(fte.computeMonthlySalary());

const ftewahp = new FullTimeEmployeeWithAdditionalHourlyPayment2(5000, 20);
console.log(ftewahp.computeOverallPayment(20));
In this way, using two functions (which themselves are objects), several target objects are created. Notice that adding new functionality is very simple, and you can reuse code fragments without creating a complex class inheritance hierarchy (the resulting objects are relatively loosely coupled).
More on these techniques:
link and link.
In JS, you can dynamically add a new property to an object at any time:
susan.newProperty = "a completely new property!";
Similarly, you can add a new method:
susan.newMethod = function () {
  return "This method was added after the object was created!";
};
We will not yet present how to write classes in JS, which indeed provide a new syntax for creating objects. However, note that classes are essentially syntactic sugar and are translated under the hood into expressions that work with prototypes and their chains!
4. Document Object Model (DOM)
The DOM is a built-in programming interface in the web browser that allows for programmatically manipulating an HTML document. Scripts running in the browser always have access to the document object, which is a reference to the root element and contains numerous methods for DOM manipulation.
The DOM can be understood as a programmatic representation of the HTML document in JavaScript. In fact, there is a complex hierarchy of implemented interfaces (an interface in JS means something different than in Java; an object implements an interface if it has the required properties and methods). For example, a <select> element has the following prototype chain:

If a script is to modify DOM elements, it is best to place it at the end of the <body> section or to use the DOMContentLoaded event to ensure that the script runs after the DOM tree has been fully loaded. This ensures that the script can operate on already existing elements. In general, scripts will run in the order they are added to the page, and it is possible that they begin executing before the entire page is loaded.
5. Events in JS
HTML elements can have attributes that bind the execution of a specific JavaScript function to a given event.
For example, suppose we have defined a button:
<button id="btn" onclick="handler(event)">button</button>
and then include a script (the parameter must be named event):
function handler(event) {
  console.log(event.target);
  console.log("The button was pressed");
  event.target.innerText = "Text changed";
}
It is also possible to write an inline handler:
<button onclick="this.innerText = 'changed text'">button2</button>
Another option is to write a handler without arguments (in which case you will not have access to the event object, so you must refer to the button in another way if needed):
<button id="btn2" onclick="handler2()">button2</button>
<script>
  function handler2() {
    document.getElementById("btn2").innerText = "changed";
  }
</script>
Another way to work with events is to programmatically add event listeners (if you are creating the document entirely by script, this may be the preferred method).
4. Document Object Model (DOM)
(Above section already covers this.)
5. Events in JS
(Above section already covers this.)
JavaScript 1
(This completes the JavaScript 1 section.)
XML (Extensible Markup Language)
(The XML section has been translated above.)
JavaScript 1 and XML
(All above sections have been translated.)
Creating Complex Layouts in JavaScript
(Now continuing with the remainder.)
Creating Complex Layouts, Responsive Web Design (RWD)
(All above sections have been translated.)
JavaScript 1 and XML, DOM, and Events
(All above sections have been translated.)
Advanced JavaScript
4. Document Object Model (DOM)
The DOM is a browser-built-in programming interface for programmatically manipulating an HTML document. Scripts running in the browser automatically have access to the document object, which is a reference to the root element and provides many methods for manipulating the DOM.
The DOM can be understood as a programmatic representation of the HTML document in JavaScript. There is a complex hierarchy of implemented interfaces (note that in JavaScript an interface has a different meaning than in Java; an object implements an interface if it possesses the required properties and methods). For example, a <select> element has the following prototype chain:
If a script is to modify DOM elements, it is best to place it at the end of the <body> section or to use the DOMContentLoaded event to ensure that the script is executed after the DOM tree has fully loaded. This ensures that the script can operate on existing elements. Generally, scripts execute in the order they are added to the page, and it is possible that their execution begins before the entire page is loaded.
5. Events in JavaScript
Elements in HTML can have attributes that bind a JavaScript function to a particular event.
For example, suppose we have defined a button:
<button id="btn" onclick="handler(event)">button</button>
Then attach a script (the argument must be named event):
function handler(event) {
  console.log(event.target);
  console.log("The button was pressed");
  event.target.innerText = "Text changed";
}
It is also possible to write an inline handler:
<button onclick="this.innerText = 'changed text'">button2</button>
Another option is to write a handler without arguments (in which case you will not have access to the event object, so you must refer to the button in another way if needed):
<button id="btn2" onclick="handler2()">button2</button>
<script>
  function handler2() {
    document.getElementById("btn2").innerText = "changed";
  }
</script>
Another way to work with events is by programmatically adding event listeners.
JavaScript 1
(This concludes the JavaScript 1 section.)
XML (Extensible Markup Language)
(The XML section above concludes the XML part.)
Advanced JavaScript Topics
4. Document Object Model (DOM)
(Already translated above.)
5. Events in JavaScript
(Already translated above.)
JavaScript 1 and XML
(All sections have now been translated.)
End of JavaScript 1 Section
XML (Extensible Markup Language)
(Translation completed above.)
Task: JavaScript 1
(All sections above are now translated.)
Now, translating the following section:
Creating Complex Layouts, Responsive Web Design (RWD)
1. Advanced CSS Animations, Responsive Web Design
1. CSS Animations
(Already translated above.)
Creating Complex Layouts, Responsive Web Design (RWD)
(The remainder of the document has now been translated.)
JavaScript 1
(All sections above are translated.)
XML (Extensible Markup Language)
(Translated above.)
JavaScript 1 and XML
(All translated above.)
Advanced Layouts in JavaScript
(Translation completed above.)
Now, translating the final section:
JavaScript 1
JavaScript 1
(The following section is to be translated.)
JavaScript 1
JavaScript 1
JavaScript is mainly an interpreted, dynamically typed, object‑oriented programming language whose syntax is derived from C, C++, and Java (generally, C‑like languages). However, it is worth immediately noting that sometimes one should not carry over programming habits from other languages into JavaScript, even if the syntax appears very similar or identical. The formal standardization of this language is handled by the ECMA organization, which issues the ECMAScript standard. JavaScript is understood as a specific implementation of that standard. This language was introduced primarily to enable dynamic content generation on the client side (in the browser) and, on the other hand, to greatly enhance the interactivity of websites. Importantly, during the development of the language, the syntax was significantly updated at one point (this version is labeled ES6). In the early stages of its development, it was assumed that aside from professional programmers, the language would be used by amateurs, hobbyists, and others not professionally engaged in programming. This resulted in a great deal of flexibility in the language and an “error forgiveness” (including syntax errors) for programmers. It is also worth noting that today JavaScript is a general-purpose language that has expanded beyond just writing interactive webpages. Separate functionalities (not necessarily available within the browser) are provided by node.js (writing backend code in JavaScript), Electron (developing web‑based desktop applications), and solutions for creating hybrid mobile applications (e.g. Ionic, React Native).
It is common to use the abbreviated, colloquial form “JS” instead of the full name JavaScript; this abbreviation may be used throughout this guide.
1. Running Scripts
The simplest way to write JavaScript programs is by using the browser’s console (which opens in an interactive, line‑by‑line code execution mode):
Alternatively, you can place your script within a <script> tag:
<!DOCTYPE html>
<html lang="en">
  <head>
    <meta charset="UTF-8" />
    <meta name="viewport" content="width=device-width, initial-scale=1.0" />
    <title>Document</title>
  </head>
  <body>
    <script>
      var a = 1; // declaration and initialization of variable a
      console.log(a); // outputs the variable to the browser console
    </script>
  </body>
</html>
Such a script will be automatically executed by the browser.
For longer scripts, this approach is rather inefficient, so you can include an external script:
<!DOCTYPE html>
<html lang="en">
  <head>
    <meta charset="UTF-8" />
    <meta name="viewport" content="width=device-width, initial-scale=1.0" />
    <title>Document</title>
  </head>
  <body>
    <script src="sample.js"></script>
  </body>
</html>
2. Declaring Variables
In the early days, the keyword var was used to declare a variable. Today, it is not recommended to use this construction in new code, especially when writing modern classes. However, much legacy code uses it, so it is still important to understand. Note that var creates a variable of any type.
var a = 1;
console.log(a); // outputs variable a in the browser console
In general, the language allows you to omit the declaration:
a = 1;
console.log(a); // outputs variable a
However, the language will automatically use a construct roughly equivalent to:
var a; // declaration of variable a
a = 1; // initialization of variable a
console.log(a); // outputs variable a
It is not recommended to omit the variable declaration; this is bad practice.
In ES6, a new method for declaring variables was introduced using let and const.
let a = 1; // a mutable variable whose value can change
const b = 0; // a constant, which is immutable and whose value cannot be changed
a += 1; // a can be modified
console.log(a);
b += 2; // this will throw an error because b is constant
Unlike using var, omitting the declaration with let or const is not allowed since the JavaScript interpreter cannot infer whether you intend a mutable variable or a constant.
It is also important to familiarize yourself with the concept of hoisting.
link
Not understanding hoisting (or not accounting for it) may lead to unexpected errors.
3. Objects in JavaScript
JavaScript has a rather unique object system. Most object-oriented languages are based on classes (class‑based object model), from which objects are created. JavaScript, however, is based on prototypes (prototype‑based object model). In short, in JS you create objects from which you can create further objects (extending the original, if necessary) without the need to write classes. Every object in JS has a prototype (which might be null, though typically the language sets one internally; manually created objects should not have a null prototype).
The simplest way to create an object in JS is by using an object literal:
const obj = {};
Despite the brevity of this syntax, the created object (as shown below) has methods:
You might wonder: where did these methods come from? Although they were not explicitly written, the object obj has its prototype set to Object. Essentially, Object is a complex data type (more here: link). Object itself has its prototype set to null:
Let us now declare a more “useful” object (again using an object literal):
const person = {
  name: null,
  printIntroduction: function () {
    return `I am ${this.name}`;
  },
};
This time, in addition to having Object as its prototype, the object has a property name and a method printIntroduction.
It is now possible to define a new object whose prototype is person (note that in the example below, the parent’s property value is simply overwritten, while the parent’s remains unchanged):
const mark = Object.create(person);
mark.name = "Mark";
Thus, the object mark has as its prototype the object person, which in turn has Object as its prototype (and Object itself has a prototype of null). In JavaScript, this chain of prototypes can become very complex and is known as the prototype chain.
More information: link and link.
Another commonly used construct is the following (constructor function):
function Person(name) {
this.name = name;
this.printIntroduction = function () {
return `I am ${this.name}`;
};
}
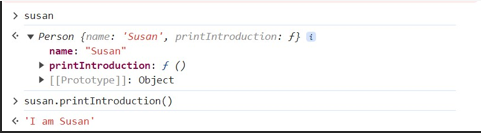
susan = new Person("Susan");
JavaScript also allows you to “compose” an object from other objects.
const HoursEmployee = {
  computeHourlyPayment(hours) {
    return hours * this.hourlyRate;
  },
};
const FullTimeEmployee = {
  computeMonthlySalary() {
    return this.salary;
  },
};
function FullTimeEmployeeWithAdditionalHourlyPayment(salary, hourlyRate) {
  return {
    salary,
    hourlyRate,
    ...FullTimeEmployee,
    ...HoursEmployee,
    computeOverallPayment(additionalHours) {
      return (
        this.computeHourlyPayment(additionalHours) + this.computeMonthlySalary()
      );
    },
  };
}
const f = new FullTimeEmployeeWithAdditionalHourlyPayment(5000, 40);
console.log(f.computeOverallPayment(10));
The object FullTimeEmployeeWithAdditionalHourlyPayment is intended to represent an employee who works full-time and also receives additional hourly pay (for example, for overtime, or perhaps to cover for another employee), in addition to their regular salary. The object is created as a composition of the HoursEmployee and FullTimeEmployee objects, along with the properties salary and hourlyRate.
Alternatively, the following construction is also possible:
const hourlyPaymenter = (state) => ({
  computeHourlyPayment(hours) {
    return hours * state.hourlyRate;
  },
});

const fullTimePaymenter = (state) => ({
  computeMonthlySalary() {
    return state.salary;
  },
});

function HourlyEmployee2(hourlyRate) {
  let x = { hourlyRate: hourlyRate };
  return Object.assign(x, hourlyPaymenter(x));
}

function FullTimeEmployee2(salary) {
  let x = { salary: salary };
  return Object.assign(x, fullTimePaymenter(x));
}

function FullTimeEmployeeWithAdditionalHourlyPayment2(salary, hourlyRate) {
  let x = { salary, hourlyRate };
  let o = Object.assign(x, hourlyPaymenter(x), fullTimePaymenter(x));
  o.computeOverallPayment = (additionalHours) => {
    return o.computeMonthlySalary() + o.computeHourlyPayment(additionalHours);
  };
  return o;
}
const he = new HourlyEmployee2(20);
console.log(he.computeHourlyPayment(5));

const fte = new FullTimeEmployee2(5000);
console.log(fte.computeMonthlySalary());

const ftewahp = new FullTimeEmployeeWithAdditionalHourlyPayment2(5000, 20);
console.log(ftewahp.computeOverallPayment(20));
In this way, using two functions (which are themselves objects), several target objects are created. Note that adding new functionality in this way is very simple, and you can repeatedly reuse code fragments without creating a complex class inheritance hierarchy (the resulting objects are fairly loosely coupled).
More on these techniques can be read here:
link and link.
You can add a new property to an object at any time dynamically:
susan.newProperty = "a completely new property!";
Similarly, you can add a new method:
susan.newMethod = function () {
  return "This method was added after the object was created!";
};
At this point, we will not yet cover writing classes in JS, which do extend object creation with a new syntax. However, note that classes are simply syntactic sugar and are translated under the hood into expressions operating on prototypes and their chains.
4. Document Object Model (DOM)
The DOM is a built-in programming interface in the web browser that is intended for programmatically manipulating an HTML document. Scripts executed in the browser always have automatic access to the document object, which is a reference to the root element, but it also contains numerous methods that allow for DOM manipulation.
The DOM can be seen as a programmatic representation of the HTML document as a JavaScript object. In fact, there is a complex hierarchy of implemented interfaces (an interface in JavaScript has a different meaning than in Java; an object implements an interface if it has the required properties and methods). For example, a <select> element has the following prototype chain:
If a script needs to modify DOM elements, it is better to place it at the end of the <body> section or use the DOMContentLoaded event to ensure the script executes after the DOM tree is fully loaded. This ensures that the script can operate on elements that already exist. In general, scripts are executed in the order they are added to the page, and it is possible that they begin executing before the entire page is loaded.
5. Events in JavaScript
HTML elements have the ability to have attributes that bind the execution of a specific JavaScript function to a particular event.
For example, assume we have defined a button:
<button id="btn" onclick="handler(event)">button</button>
and then include a script (the argument must be named event):
function handler(event) {
  console.log(event.target);
  console.log("The button was pressed");
  event.target.innerText = "Text changed";
}
It is also possible to write an inline handler:
<button onclick="this.innerText = 'changed text'">button2</button>
Another option is to write a handler without arguments (in which case you will not have access to the event object, so you would need to refer to the button another way if necessary):
<button id="btn2" onclick="handler2()">button2</button>
<script>
  function handler2() {
    document.getElementById("btn2").innerText = "changed";
  }
</script>
Another method for working with events is to programmatically add event listeners.
XML (Extensible Markup Language)
XML (Extensible Markup Language) is a language that was created as a way to simplify the syntax of SGML while preserving its main capabilities (i.e. the ability to define arbitrary documents and custom tags). Its syntax resembles HTML (and therefore SGML), except that unlike HTML it does not have predefined tags; instead, it is up to the programmer to define custom tags, optionally attaching a DTD (Document Type Definition) or an XML Schema—serving as a sort of grammar—that defines the conditions the document must satisfy to be considered valid. Some consider XML to be a meta‑language, since in a sense it is used to define actual languages (i.e. languages that handle a specific use case, model a particular problem, etc.). XML is also often described as a semistructured format, meaning that XML defines both its structure and content simultaneously.
XML differs from HTML in that it takes a much more rigorous approach to document formatting. While HTML is, in practice and de jure, “forgiving” with syntax errors, an XML parser will typically throw a parsing error immediately and cease further processing if any error is encountered. This approach makes it much easier to write a correct XML parser, which is also considerably lighter than an HTML parser—an important factor in some applications.
XML is often used as a universal format for transmitting information between IT systems (although it is currently being replaced by JSON in this context).
Another common use for XML is in configuration files.
XML has also become the basis for defining office documents such as those in the MS Office suite (Office Open XML) or
OpenDocument.
XML is also used to define presentation layers (instead of, or modeled on, HTML) in some applications (e.g. native Android apps, JavaFX).
For example, suppose we want to store information about an online store customer. In order to issue an invoice, you need to know their first and last name and address. At the same time, it is possible that the mailing address (for delivery) is different from the address to be printed on the invoice.
This problem can be modeled using an XML document such as the following:
<?xml version="1.0" encoding="UTF-8"?>
<person>
    <name>Jan</name>
    <surname>Kowalski</surname>
    <address>
        <city>Rzeszów</city>
        <street>Rejtana 16c</street>
    </address>
    <address type="correspondence">
        <city>Rzeszów</city>
        <street>Rejtana 16c</street>
    </address>
</person>
-
The first line contains the XML declaration. The declaration is optional; if the programmer/author does not provide one, the default value is assumed:
<?xml version="1.0" encoding="UTF-8" standalone="no" ?>
Its purpose is to specify the XML version and the encoding used to save the document. In addition, the declaration may also include information regarding whether the document contains references to external data sources. -
Next, the document contains the
<person>element, which is the root of the document.- Every valid XML document must have exactly one root. (Terminology in XML is taken from family tree nomenclature; thus, the
<person>element is the parent of the elements directly inside it.) - You can define infinitely many child elements within the root.
- Every valid XML document must have exactly one root. (Terminology in XML is taken from family tree nomenclature; thus, the
-
Inside the
<person>element are child elements:<name>,<surname>, and<address>.- In most sources, the
<name>,<surname>, and<address>elements are defined as children of<person>. - Child elements can also have their own children, as in the above example where
<address>contains<city>and<street>.
- In most sources, the
-
The second
<address>element (child of<person>) has an attributetypethat indicates whether it is the correspondence address or the residential address.- Attributes are defined as key–value pairs separated by an equals sign.
- An element may have infinitely many attributes.
- Attribute values in XML must be enclosed in quotes.
- Attributes are often used to store meta‑information, though they can also be used to store data.
- There are certain limitations that may serve as a guide in choosing between attributes and child elements. An element cannot have two or more attributes with the same name, and attributes only accept string values, which is a limitation in some cases.
Element Names:
- Must begin with a letter or an underscore (“_”).
- May contain letters, digits, underscores (“_”), periods (“.”), and hyphens (“-”).
- Must not contain spaces.
Attribute Names:
- Follow similar rules as element names.
- Every attribute within a given element must have a unique name.
The result of displaying the above example in a browser:

Although this form is correct according to the XML standard, there is one problem at the moment: no rules have been defined regarding what the <person> element should contain (i.e. no grammar that defines the validity of this specific XML document).
It is therefore possible to define such an XML document:
<?xml version="1.0" encoding="UTF-8"?>
<person>
    <name>Jan</name>
    <surname>Kowalski</surname>
    <address>
        <city>Rzeszów</city>
        <street>Rejtana 16c</street>
    </address>
    <address type="correspondence">
        <city>Rzeszów</city>
        <street>Rejtana 16c</street>
    </address>
    <some></some>
    <additional></additional>
</person>
It contains two additional elements (it is difficult to determine what information they store about the customer). However, as long as we do not break XML rules (for example, by not closing a tag), this document will be considered valid XML. Although adding extra elements might be neutral in the context of the given problem, if, for example, the first and last name were omitted, it would not be possible to issue a correct invoice.
Below is an example of an incorrectly formatted XML document and the result of its display in a browser:
<?xml version="1.0" encoding="UTF-8"?>
<person>
    <name>Jan</name>
    <surname>Kowalski</surname>
    <address>
        <city>Rzeszów</city>
        <street>Rejtana 16c</street>
    </address>
    <address type="correspondence">
        <city>Rzeszów</city>
        <street>Rejtana 16c</street>
    </address>
    <some></some>
    <additional>
</person>

As mentioned earlier, it is possible to define the correct structure of an XML document using DTD (Document Type Definition). DTD is, in essence, an independent formal language used to describe what constitutes a valid document. DTD was developed during the SGML era. It is worth noting that in the past DTD was also used in HTML, and for a period its usage was mandatory.
It is important to note that there will be differences in the DTDs for SGML, HTML, and XML (regarding the language’s offered functionalities).
The standard method to include a DTD in a document is by using the Document Type Declaration (DOCTYPE).
For example, to add a DTD (an internal DTD) to a document:
<?xml version="1.0" encoding="UTF-8"?>
<!DOCTYPE person [
  <!ELEMENT person (name, surname, address+)>
  <!ELEMENT name (#PCDATA)>
  <!ELEMENT surname (#PCDATA)>
  <!ELEMENT address (city, street)>
  <!ELEMENT city (#PCDATA)>
  <!ELEMENT street (#PCDATA)>
  <!ATTLIST address type (residence | correspondence) "residence">
]>
<person>
    <name>Jan</name>
    <surname>Kowalski</surname>
    <address>
        <city>Rzeszów</city>
        <street>Rejtana 16c</street>
    </address>
    <address type="correspondence">
        <city>Rzeszów</city>
        <street>Rejtana 16c</street>
    </address>
</person>
The following rules are established:
- The root element is
person. - The
personelement consists of the elementsname,surname, andaddress. - There must be exactly one
nameand onesurnameelement, while there may be manyaddresselements (at least one must be present, as indicated by the+). - The
nameandsurnameelements are of type PCDATA (Parsed Character Data), meaning they should be parsed by XML (i.e. they may contain text or further nested elements). - The
addresselement consists of two elements:cityandstreet, which are also of type PCDATA. - The
addresselement has an attributetypethat can take the valuesresidenceorcorrespondence, with a default value ofresidence(if not explicitly defined).

As you can see, when the document is displayed, the type attribute is automatically added with the default value for the first address element.
This time, if you try to add the elements some and additional, the XML validator will return the following errors:

Defining complex DTDs within documents is generally impractical. In practice, external DTDs are often used:
<?xml version="1.0" encoding="UTF-8"?>
<!DOCTYPE person SYSTEM "person.dtd">
<person>
    <name>Jan</name>
    <surname>Kowalski</surname>
    <address>
        <city>Rzeszów</city>
        <street>Rejtana 16c</street>
    </address>
    <address type="correspondence">
        <city>Rzeszów</city>
        <street>Rejtana 16c</street>
    </address>
</person>
And the external DTD file (person.dtd):
<!ELEMENT person (name, surname, address+)>
<!ELEMENT name (#PCDATA)>
<!ELEMENT surname (#PCDATA)>
<!ELEMENT address (city, street)>
<!ELEMENT city (#PCDATA)>
<!ELEMENT street (#PCDATA)>
<!ATTLIST address type (residence | correspondence) "residence">
The modifier SYSTEM here indicates that we are not referring to some official standard, i.e. we are using a local (system) DTD, for which you must then provide the correct URL; alternatively, the PUBLIC modifier can be used, where you must provide a PublicID (and optionally a URL, though in practice it is usually mandatory).
In older versions of HTML, for example, a DOCTYPE such as the following was used:
<!DOCTYPE HTML PUBLIC "-//W3C//DTD HTML 4.01 Transitional//EN"
   "http://www.w3.org/TR/html4/loose.dtd">
<html>
  ...
</html>
Whereas the DOCTYPE for XHTML might look like this:
<?xml version="1.0" encoding="UTF-8"?>
<!DOCTYPE html PUBLIC "-//W3C//DTD XHTML 1.0 Strict//EN"
     "http://www.w3.org/TR/xhtml1/DTD/xhtml1-strict.dtd">
<html xmlns="http://www.w3.org/1999/xhtml" xml:lang="en" lang="en">
  ...
</html>
Because DTD was inherited from SGML, with the development of XML various shortcomings and limitations of it were noted. Consequently, it was later decided to replace it with XML Schema, which is now the dominant approach to defining the structure of a valid XML document.
XML Schema is essentially an XML document that defines the correct structure of another XML document. To use XML Schema, you define an XSD (XML Schema Definition). The attribute xmlns defines a specific namespace (the XML namespace). If you add a prefix (which can be arbitrary) to this attribute, you can also require that elements defined in that namespace be prefixed accordingly. This is mainly to ensure that, in cases where element names from different sources overlap, they can be distinguished. It is worth noting that the value of xmlns should be a URI or URN, which should be unique in principle, even though the referenced resource may not actually exist (i.e. it may not be a valid URL that can be opened).
For example, the following XML, which defines the layout of a mobile application in Android, refers to a namespace using a link that, in this context, will not actually open (i.e. it is a URI rather than a URL):
<FrameLayout xmlns:android="http://schemas.android.com/apk/res/android"
    android:layout_width="match_parent"
    android:layout_height="match_parent"
    android:id="@+id/container">
</FrameLayout>
It is important to note that XSD files are ultimately validated using DTD. In theory, there is an XSD for XML Schema itself: https://www.w3.org/2001/XMLSchema.xsd, though within it there is a reference to a DTD: https://www.w3.org/2001/XMLSchema. Similarly, there is an XSD for XML documents: https://www.w3.org/2001/03/xml.xsd, which also refers to the aforementioned DTD.
Below is an example XSD (for the example discussed earlier):
<?xml version="1.0" encoding="UTF-8"?>
<xs:schema xmlns:xs="http://www.w3.org/2001/XMLSchema">
    <xs:attribute name="type" default="residence">
        <xs:simpleType>
            <xs:restriction base="xs:string">
                <xs:enumeration value="residence"/>
                <xs:enumeration value="correspondence"/>
            </xs:restriction>
        </xs:simpleType>
    </xs:attribute>

    <xs:element name="person">
        <xs:complexType>
            <xs:sequence>
                <xs:element name="name" type="xs:string" minOccurs="1"/>
                <xs:element name="surname" type="xs:string" minOccurs="1"/>
                <xs:element name="address" minOccurs="1" maxOccurs="unbounded">
                    <xs:complexType>
                        <xs:sequence>
                            <xs:element name="city" type="xs:string" minOccurs="1"/>
                            <xs:element name="street" type="xs:string" minOccurs="1"/>
                        </xs:sequence>
                        <xs:attribute ref="type"/>
                    </xs:complexType>
                </xs:element>
            </xs:sequence>
        </xs:complexType>
    </xs:element>
</xs:schema>
person.xsd
- The root element
<xs:schema>is created and belongs to the namespacexs. The provided URL leads to a DTD file that defines a correct XSD document. - Using XSD syntax, you achieve an effect equivalent to what was previously accomplished with DTD.
Next, an XML document is created:
<?xml version="1.0" encoding="UTF-8"?>
<person xmlns:xsi="http://www.w3.org/2001/XMLSchema-instance"
    xsi:noNamespaceSchemaLocation="person.xsd">
    <name>Jan</name>
    <surname>Kowalski</surname>
    <address>
        <city>Rzeszów</city>
        <street>Rejtana 16c</street>
    </address>
    <address type="correspondence">
        <city>Rzeszów</city>
        <street>Rejtana 16c</street>
    </address>
</person>
person.xml
- The root element
<person>is declared, and it is stated that it is an instance of the schema defined in the fileperson.xsd. The defined schema does not create a separate namespace.
Additional reference materials:
- XML 1.0 Specification: link
- Document validity (both syntactic and structural):
link
link
link - XML Schema 1.1 Specification: https://www.w3.org/XML/Schema.html#dev
- Examples of using XML Schema as the structure for XML documents:
link
Lab Setup:
- Open Visual Studio Code.
- Install the “XML” extension:
link
Task 1.
Propose both a DTD and an XSD for the following XML document. Test the result using any XML validator.
<?xml version="1.0" encoding="UTF-8"?>
<emails>
  <email>
    <to>address@mail.com</to>
    <from>Spam</from>
    <heading>Offer</heading>
    <body>Do you want to buy our products?</body>
  </email>
  <email>
    <to>address@mail.com</to>
    <from>coworker@mail.com</from>
    <heading>Document</heading>
    <body>Please see this document and reply asap.</body>
    <attachements>
      <attachement>
          <name>Document.odt</name>
      </attachement>
    </attachements>
  </email>
</emails>
Task 2.
Using the XSD available here:
link
define an XML document compliant with this XSD (and declare this so that the parser/validator can validate the document in real time).
Task 3.
Create an example XML file named rozklad.xml regarding train timetables, according to the following requirements:
For a train timetable, the document must include information about the validity period (start date and end date). For each train in the timetable, information should be available about:
- Train number (an integer),
- Carrier name (maximum 15 characters),
- Type of train (passenger, fast, express),
- An optional train name,
- Stations (at least 2) where the train stops, along with their names, arrival and departure times,
- A composition of 1–5 carriages (second-class, first-class, sleeping, couchette, and a restaurant carriage).
<?xml version="1.0" encoding="UTF-8"?>
<rozklad>
    <!-- file content goes here -->
</rozklad>
-
Open the completed file rozklad.xml in a web browser to check that it parses correctly (i.e. it is well-formed).
-
Familiarize yourself with the basic concepts of XML Schema:
-
Generate an initial definition of the structure for XML files storing train timetables:
- Complete the root element
<rozklad>as shown below, - Then in VSCode place the cursor on the filename rz1.xsd and click on the yellow lightbulb, then select “Generate missing rz1.xsd”.
- An initial XML Schema (using the Russian Doll pattern) will be generated.
- Review the newly generated file and edit it so that it meets all the requirements specified in the task.
- Complete the root element
<rozklad xmlns:xsi="http://www.w3.org/2001/XMLSchema-instance"
         xsi:noNamespaceSchemaLocation="rz1.xsd">

- Return to rozklad.xml and test its structural validity.

-
Create a file rz2.xsd in which you prepare a definition of the document structure, but this time using the Venetian Blind pattern.
-
In rozklad.xml, replace the current reference to rz1.xsd with rz2.xsd. Then test the structural validity.
-
Try an online tool to generate an XSD according to different patterns. Also test structural validity.
link
link
Task 4.
For the example person.xml, add the following line:
<?xml-stylesheet type="text/css" href="person.css"?>
Also add the following stylesheet:
* {
  margin: 10px;
}
person {
  display: flex;
  flex-direction: column;
  color: white;
  background-color: black;
}
address {
  border: 1px solid white;
}
• What is the rendering effect of the document this time?
In addition to styling XML with CSS, it is possible to transform it into another document (either XML or HTML). For this, XSL (eXtensible Stylesheet Language) is used. In the case of transforming XML into HTML, you can give it a more user-friendly structure and appearance.
Replace the CSS stylesheet reference with:
<?xml-stylesheet type="text/xsl" href="person.xsl"?>
<?xml version="1.0"?>
<xsl:stylesheet version="1.0" xmlns:xsl="http://www.w3.org/1999/XSL/Transform">
<xsl:template match="/">
<html>
<head>
<title>Orders</title>
<style>
* { margin: 10px; }
person {
display: flex;
flex-direction: column;
color: white;
background-color: black;
}
address {
border: 1px solid white;
}
</style>
</head>
<body>
<h2>Orders</h2>
<table class="my-table">
<tr>
<th>Name</th>
<th>Surname</th>
<th>Residence address</th>
<th>Correspondence address</th>
</tr>
<xsl:for-each select="person">
<tr>
<td><xsl:value-of select="name"/></td>
<td><xsl:value-of select="surname"/></td>
<xsl:for-each select="address">
<td>
<xsl:value-of select="city"/>   <xsl:value-of select="street"/>
</td>
</xsl:for-each>
</tr>
</xsl:for-each>
</table>
</body>
</html>
</xsl:template>
</xsl:stylesheet>
Notice that XSL allows you to define nontrivial patterns. For example, in the table we create, the addresses are concatenated as city and street.
• Render the XML transformed by XSL into HTML (i.e. in a tabular form).
• Modify the example so that the table displays several customers. This means the XML must allow multiple <person> elements (e.g. define an XML Schema for persons) that are correctly transformed into a table (which requires editing the XSL file). To avoid redundancy, use person.xsd by including it into persons.xsd via an include.