Tasks studies - laboratory
Project maintained by dawidolko Hosted on GitHub Pages — Theme by dawidolko
JavaScript 2 – Saving Application State
JSON and JavaScript are closely related concepts in the world of programming. JSON (JavaScript Object Notation) is a data format derived from JavaScript that is based on the object syntax of the language. It is a way of representing data in a form that is readable both by humans and machines.
The JSON syntax is very similar to the syntax for objects and arrays in JavaScript, which makes the format easy to understand for developers working in JS. JavaScript uses methods such as JSON.parse() to convert JSON data into JS objects and JSON.stringify() to convert JavaScript objects into JSON format.
Data in JSON format are widely used in web applications as a means of transferring data between the server and the browser. In addition, JSON has found wide usage in storing data in NoSQL databases, in application configurations, and as a data interchange format between different systems and platforms.
Although JSON has its roots in JavaScript, it has become a universal data format used in other programming languages as well. It is an efficient way to store and process data, and it has gained popularity thanks to its simplicity, flexibility, and readability. More details can be found in the specification:
Rules for Creating JSON Files
- Objects: Key–value pairs are written inside curly braces
{}. The key must be a string enclosed in double quotes, and the value can be any supported data type (number, string, object, array, boolean, or null), separated by a colon. - Arrays: Written within square brackets
[]and contain values separated by commas; these values can be any supported data type, including other objects or arrays. - Strings: Text is enclosed in double quotes
" ". They may be single words, sentences, or sequences of characters. - Numbers: Can be written as integers or floating-point numbers, positive or negative.
- Boolean values: The possible values are
trueorfalse, representing truth or falsehood. - Null value: Represents the absence of a value and is written as
null. - Commas: Elements in objects and arrays are separated by commas, except for the last element, which should not be followed by a comma.
- Formatting: JSON ignores whitespace outside of strings, but extra whitespace (such as spaces, tabs, newlines) can be used to improve readability.
- No Comments: JSON does not support comments. They should not be used in JSON files because they can cause syntax errors.
- Unique Keys: Keys in JSON objects must be unique.
Below is an example JSON file:
{
  "osoba": {
    "imie": "Anna",
    "nazwisko": "Kowalska",
    "wiek": 30,
    "adres": {
      "ulica": "Kwiatowa",
      "numer": 10,
      "miasto": "Warszawa"
    },
    "telefon": ["123-456-789", "987-654-321"],
    "aktywny": true,
    "znizka": null
  },
  "produkty": [
    {
      "nazwa": "Koszula",
      "rozmiar": "M",
      "cena": 49.99,
      "dostepny": true
    },
    {
      "nazwa": "Spodnie",
      "rozmiar": "L",
      "cena": 79.99,
      "dostepny": false
    }
  ]
}
Converting JSON to a JavaScript Object and Accessing Object Fields
// Example JSON string
const jsonString = '{
    "name": "John",
    "age": 30,
    "city": "New York"
}';

// Convert JSON to an object
const jsonObject = JSON.parse(jsonString);

// Access object fields
console.log("Name: " + jsonObject.name);  // Outputs: Name: John
console.log("Age: " + jsonObject.age);    // Outputs: Age: 30
console.log("City: " + jsonObject.city);  // Outputs: City: New York
Cookies, Local Storage, and Session Storage are mechanisms for storing data in the web browser. Each has its own usage depending on the application’s needs, data retention time, and the nature of the data to be stored.
Cookies
- Cookies are small files stored in the user’s web browser.
- They are used to store data such as user preferences, session data, or navigation information.
- They can typically store around 4KB of data.
- They can have an expiration date (temporary) or be persistent (remaining even after the browser is closed).
- HttpOnly flag – This flag can be set on a cookie to prevent JavaScript from accessing the cookie. This helps protect against XSS (Cross-Site Scripting) attacks, where unauthorized scripts try to access a user’s cookies.
// Cookie named "user" with value "John Doe" that expires in 30 days for the specific domain "example.com"
const expirationDate = new Date(
  Date.now() + 30 * 24 * 60 * 60 * 1000
).toUTCString();
document.cookie =
  "user=John Doe; expires=" + expirationDate + "; domain=example.com; path=/";

// Cookie named "darkMode" with value "true" that expires in 365 days for the domain "anotherdomain.com"
const anotherExpirationDate = new Date(
  Date.now() + 365 * 24 * 60 * 60 * 1000
).toUTCString();
document.cookie =
  "darkMode=true; expires=" +
  anotherExpirationDate +
  "; domain=anotherdomain.com; path=/";
Local Storage
- Local Storage is a browser interface that allows an application to store data in the user’s browser.
- It is primarily used for persistent data storage that remains even after the browser is closed.
- It can store up to approximately 5MB of data.
- The stored data persists until it is manually removed or cleared.
// Saving data in localStorage
localStorage.setItem("userName", "JohnDoe");
localStorage.setItem("userAge", "25");

// Retrieving data from localStorage
const name = localStorage.getItem("userName");
const age = localStorage.getItem("userAge");
console.log(`User Name: ${name}, Age: ${age}`);

// Removing data from localStorage
localStorage.removeItem("userName");

// Checking the number of stored items
const dataCount = localStorage.length;
console.log(`Number of items stored in localStorage: ${dataCount}`);

// Clearing all data from localStorage
localStorage.clear();
Session Storage
- Similar to Local Storage, Session Storage is an interface for storing data in the browser, but the data is associated with a specific session.
- Data stored in Session Storage persists only for the duration of the session, and is removed once the tab or browser is closed.
- It has a similar limit to Local Storage (approximately 5MB).
- Data is stored only until the session ends (i.e., when the browser tab or window is closed).
// Saving data in sessionStorage
sessionStorage.setItem("userName", "JohnDoe");
sessionStorage.setItem("userAge", "25");

// Retrieving data from sessionStorage
const name = sessionStorage.getItem("userName");
const age = sessionStorage.getItem("userAge");
console.log(`User Name: ${name}, Age: ${age}`);

// Removing data from sessionStorage
sessionStorage.removeItem("userName");

// Checking the number of stored items in sessionStorage
const dataCount = sessionStorage.length;
console.log(`Number of items stored in sessionStorage: ${dataCount}`);

// Clearing all data from sessionStorage
sessionStorage.clear();
REST API
A REST API (Representational State Transfer Application Programming Interface) is an architectural style that defines a set of principles for communication between web applications. REST is a design style for APIs that uses standard web protocols such as HTTP, URI, and JSON to enable communication between clients and servers.
1. Resource-Based Architecture
- REST treats data as resources that are represented via URIs (Uniform Resource Identifiers).
- Each resource has a unique URI (for example,
/users,/products/123).
2. HTTP Protocols and Methods
- It uses standard HTTP methods such as GET, POST, PUT, DELETE, PATCH to perform operations on resources.
- These methods correspond to CRUD operations (Create, Read, Update, Delete) on resources.
3. Statelessness
- REST is stateless, meaning that each request to the server is independent and does not retain any state afterward.
- Each request contains all the information necessary for the server to understand and process it.
4. Data Format
- REST APIs often use data formats such as JSON (JavaScript Object Notation) or XML (Extensible Markup Language) to represent resources.
- JSON is more commonly used due to its readability and ease of handling in browsers.
5. Uniform Interface
- A REST API provides a uniform interface between clients and servers, making it easier for different applications to understand and use the API.
The above principles will be useful when implementing a REST API. For now, it is important to remember that the HTTP GET method is used to request a resource from a REST API at a given URL.
An older interface for sending requests was XHR (XMLHttpRequest):
link
Nowadays, the fetch API is used:
link
An example of a free API that does not require authentication via an API key is available here:
link
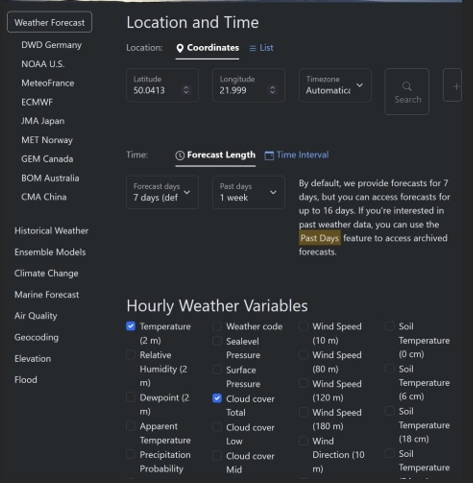
In the documentation, there is a form where you can create a link to the resources of interest:
Another widely used example of documentation is one similar to:
link
For example, here is a sample request to open-meteo.com for temperature and cloud cover data for 7 days before and 7 days after today:
// URL for the weather forecast data
const weatherForecastURL =
  "https://api.open-meteo.com/v1/forecast?latitude=50.0413&longitude=21.999&hourly=temperature_2m,cloud_cover&timezone=auto&past_days=7";

// Use fetch to get the data
fetch(weatherForecastURL)
  .then((response) => {
    // Check if the response is OK (status code 200)
    if (!response.ok) {
      throw new Error("Network response was not ok.");
    }
    return response.json(); // Parse the response as JSON
  })
  .then((data) => {
    // Handle the data from the response
    console.log("Received data:", data);
    // Here you can process the weather data
  })
  .catch((error) => {
    // Handle errors
    console.error("An error occurred:", error);
  });
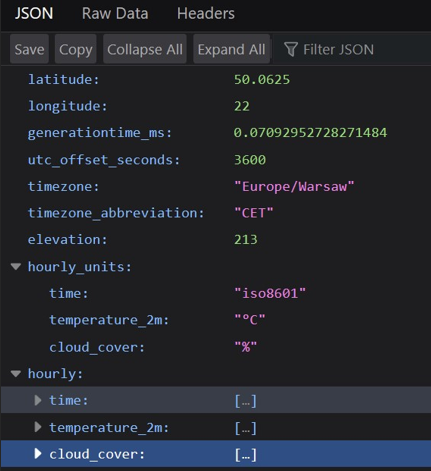
Calling this request will return data in JSON format where arrays such as time, temperature_2m, and cloud_cover contain data for time, temperature, and cloud cover for consecutive hours:
Canvas
The Canvas element provides a programming interface that allows for real‑time rendering of graphics in the web browser. It is commonly used in web design, graphics creation tools, online games, and anywhere dynamic graphics are key to interactivity and visualization.
The following example creates three lines in a canvas:
<!DOCTYPE html>
<html lang="en">
  <head>
    <meta charset="UTF-8" />
    <meta name="viewport" content="width=device-width, initial-scale=1.0" />
    <title>Document</title>
  </head>
  <body>
    <canvas
      id="myCanvas"
      width="400"
      height="200"
      style="border:1px solid #000;"></canvas>
    <script>
      // Get the canvas element
      const canvas = document.getElementById("myCanvas");
      const ctx = canvas.getContext("2d");

      // Draw lines
      ctx.beginPath();
      ctx.moveTo(50, 50); // Starting point of the first line (x=50, y=50)
      ctx.lineTo(200, 50); // End of the first line (x=200, y=50)
      ctx.moveTo(50, 100); // Starting point of the second line (x=50, y=100)
      ctx.lineTo(200, 100); // End of the second line (x=200, y=100)
      ctx.moveTo(50, 150); // Starting point of the third line (x=50, y=150)
      ctx.lineTo(200, 150); // End of the third line (x=200, y=150)
      ctx.stroke(); // Render the lines
    </script>
  </body>
</html>
For more examples of drawing shapes, see:
link
Task 1.
Create a form that saves the data entered into localStorage in real time.
Steps:
- Create an extensive HTML form with several fields for personal and contact data (e.g. first name, last name, address, email, age).
- Use input events to save the form data to localStorage as the user types.
<!DOCTYPE html>
<html lang="en">
  <head>
    <meta charset="UTF-8" />
    <meta name="viewport" content="width=device-width, initial-scale=1.0" />
    <title>Document</title>
  </head>
  <body>
    <form>
      <input id="pole_form" type="text" />
    </form>
    <script>
      document
        .getElementById("pole_form")
        .addEventListener("keyup", function (e) {
          // Log the form field value using e.target, which refers to the element where the event occurred
          console.log(e.target.value);
          // Log the value using "this"
          console.log(this.value);
        });
    </script>
  </body>
</html>
- When the page loads, check if data is stored in localStorage.
- Populate the form fields with the saved data (if available).
Additional notes:
- Ensure that the data is saved to localStorage as it is entered.
- Verify that the data is read and fills the form fields upon reloading the page.
Task 2.
Create an application that retrieves temperature data for the next 7 days from the open-meteo.com API and displays it in a table where the text color reflects the temperature value.
Steps:
- Use the open-meteo.com API to fetch the 7-day temperature forecast.
- Create an HTML table to display dates and forecasted temperatures.
- Set the text color by modifying the styles based on the temperature value (e.g., cool colors for low temperatures, warm colors for high temperatures).
- Display the table with appropriate text colors that reflect the temperature values.
Additional notes:
- Verify that the data is fetched and displayed correctly.
- Ensure that the text color in the table reflects the temperature values as intended.
Task 3.
Create a temperature chart based on the previously fetched data from the open-meteo.com API using the Canvas element.
Steps:
- Prepare a Canvas element to serve as the drawing area for the temperature chart.
- Using the previously fetched data, create a line chart representing temperature over the coming days.
Refer to the Canvas API documentation for necessary functions:
link - Adjust the chart’s scale so that it is legible and accurately reflects the temperature changes.
- Add appropriate axis labels and a chart title.
Additional notes:
- Ensure that the chart correctly reflects the temperature changes over the days.
- Check that the chart axes are legible and include appropriate labels.